Observing containerized Java with the OpenTelemetry Java agent and Jib using Gradle
Since quite some time the OpenTelemetry project has been gaining momentum in cloud-native environments. It standardizes observability across applications and services. The OpenTelemetry team has provided us with amazing zero-code instrumentation for the Java platform, but setting it up can be unintuitive. Today, I will be demonstrating a simple approach using Gradle and Jib.
What is OpenTelemetry
The OpenTelemetry project is a collection of standards, libraries, and applications that come together to form a vendor-neutral open source observability ecosystem.
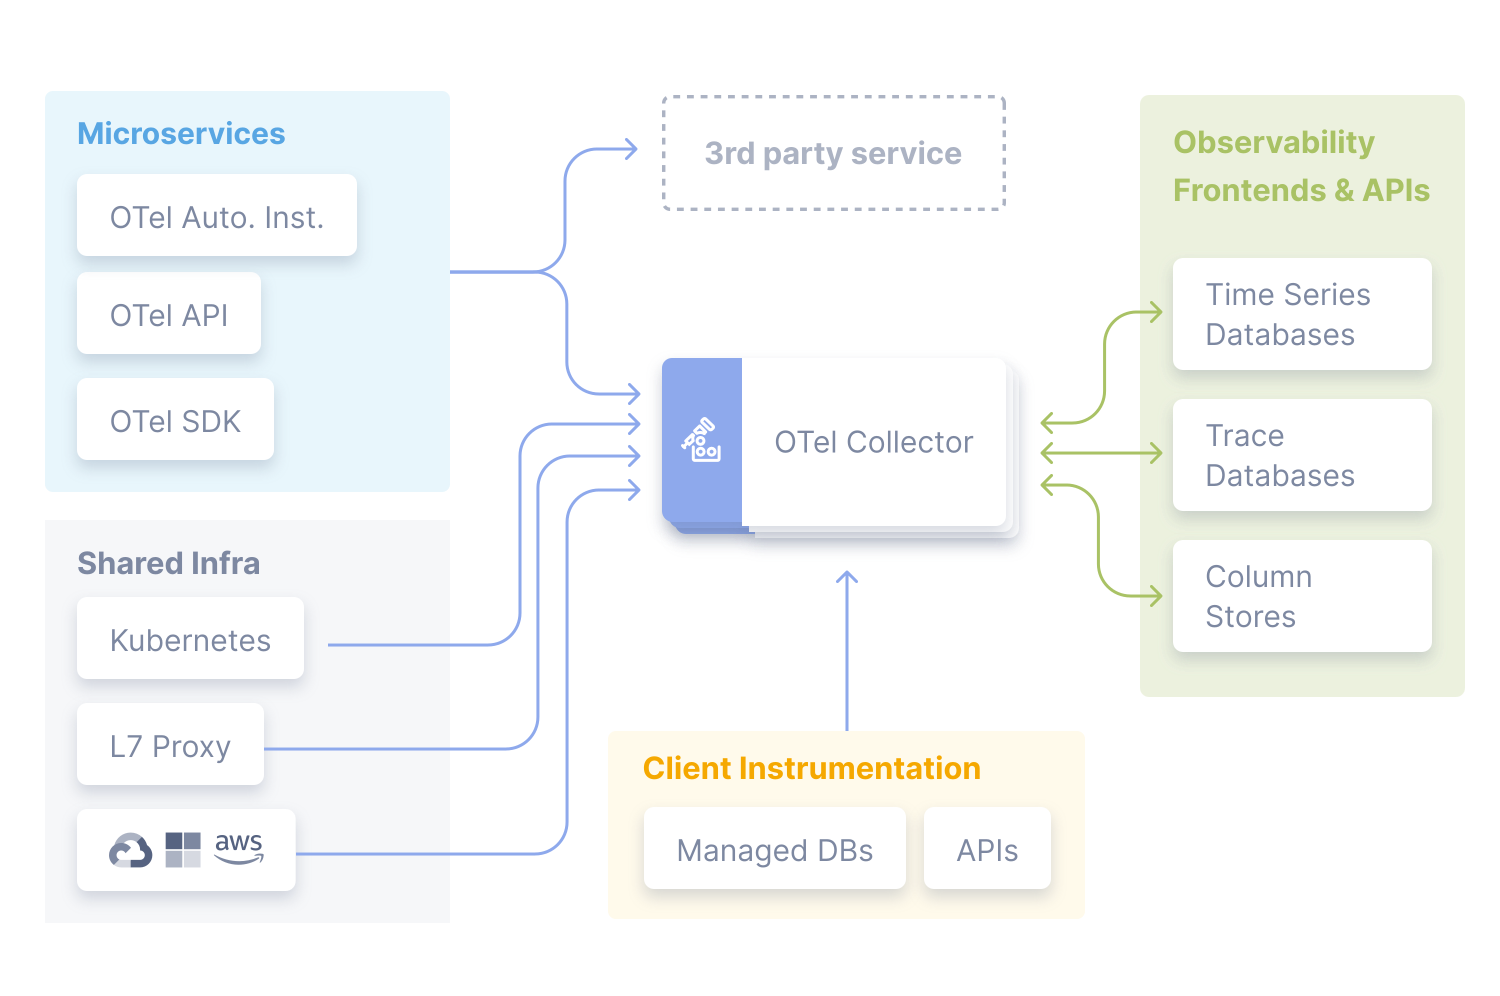
When looking at the overview diagram of the OpenTelemetry ecosystem, we see "OTel Auto. Inst." in the top left. This is what we will be focussing on in this article.
OpenTelemetry Zero-Code Instrumentation
As part of its suite of libraries, OpenTelemetry provides zero-code instrumentation for .NET, Go, Java, JavaScript, PHP, and Python.
The OpenTelemtry documentation the goals of this zero-code instrumentation as succinctly as possible:
Zero-code instrumentation adds the OpenTelemetry API and SDK capabilities to your application typically as an agent or agent-like installation. The specific mechanisms involved may differ by language, ranging from bytecode manipulation, monkey patching, or eBPF to inject calls to the OpenTelemetry API and SDK into your application.
Typically, zero-code instrumentation adds instrumentation for the libraries you’re using. This means that requests and responses, database calls, message queue calls, and so forth are what are instrumented. Your application’s code, however, is not typically instrumented. To instrument your code, you’ll need to use code-based instrumentation.
We will be installing the Java agent in a Docker container to monitor our application.
The Approach
A long time ago I stumbled upon the following problems:
- Managing the Dockerfile can be hard.
- The syntax for enabling the agent in the Dockerfile is easily broken.
- Knowing when a new version of the agent is released can be considered difficult.
- The agent is not easily cached across CI builds, this is annoying.
I solved all of these problems by using the Gradle distribution plugin and Jib, a tool built by Google to build optimized Docker and OCI images using a Gradle (or Maven) plugin.
All examples will use the Gradle Kotlin syntax. This has been the default since 2023.
First, we have to install the distribution and Jib plugins:
build.gradle.kts
plugins {
    id("java")
    id("distribution") // distribution-base also works >= Gradle 8.13
    id("com.google.cloud.tools.jib") version "3.4.4"
}
Before jumping ahead, we will do something unexpected. We will create a Gradle configuration to house our agent:
build.gradle.kts
val openTelemetryAgent: Configuration by configurations.creating
After this, we can use the configuration to define a dependency on the OpenTelemetry Java agent:
build.gradle.kts
dependencies {
    // ...
    openTelemetryAgent("io.opentelemetry.javaagent:opentelemetry-javaagent:2.13.3")
    // ...
}
Luckily for us, the OpenTelemetry team publishes a Maven artifact for us.
The custom configuration makes sure that we do not include our agent in our final application JAR by accident. It also makes bots like Dependabot and Renovate aware of the dependency. The dependency is also exposed to the ben-manes/gradle-versions-plugin, if you use it.
Now, define a distribution that contains our agent. Gradle automatically manages build caching based on the from
method.
build.gradle.kts
distributions {
    create("openTelemetryAgent") {
        distributionBaseName = "otel-agent"
        contents {
            from(openTelemetryAgent)
            rename("opentelemetry-javaagent-.*.jar", "otel-javaagent.jar")
        }
    }
}
Notice that we strip the version number of the Maven artifact. The agent JAR is stored in the
build/install/otel-agent/otel-javaagent.jar directory (when building or calling the distribution installation Gradle
task).
We will now configure Jib (make sure not to forget to import the Jib Gradle plugin):
build.gradle.kts
jib {
    container {
        ports = listOf("8080/tcp") // Configure the port(s) exposed by your app
        // === This is optional-language env vars are usually defined by your base image
        environment = mapOf(
            "SERVER_PORT" to "8080", // Works on Spring
            "LANG" to "en_US.UTF-8",
            "LANGUAGE" to "en_US:en",
            "LC_ALL" to "en_US.UTF-8"
        )
        // === Above here is optional
        jvmFlags = listOf("-javaagent:/agent/otel/otel-javaagent.jar")
    }
    extraDirectories {
        paths {
            path {
                setFrom(layout.buildDirectory.file("./install/otel-agent"))
                into = "/agent/otel"
            }
        }
    }
    from {
        image = "eclipse-temurin:21"
    }
    to {
        image = "ghcr.io/my_repository/my_image"
        tags = listOf("latest") // Or use an environment variable in your CI
    }
}
For all options, see the Jib Gradle plugin configuration reference.
As you can see, we copy the otel-javaagent.jar from the build directory into the /agent/otel directory of the image
during built time. We then activate it using -javaagent:/agent/otel/otel-javaagent.jar.
However, we are missing one final step. It is crucial that we let Gradle know that we need the distribution to run our
:jib tasks:
build.gradle.kts
tasks {
    // ...
    this@tasks.jib {
        dependsOn(getByName("installOpenTelemetryAgentDist"))
    }
    // ...
}
Don't focus too much on the syntax. Without the this@tasks. the wrong thing is referenced.
We are finished! Run the :jib or :jibDockerBuild tasks to create a container image on your local machine and test it
out!
Please refer to the OpenTelemetry documentation to determine what environment variables you can use.
Note that this also works with other Java agents, like the AppDynamics Java Agent or New Relic Java Agent.
Why not use the Spring Boot Starter?
The Spring Boot starter can only instrument libraries that Spring manages itself.
For example, when using Log4j2 with Spring, you need to configure the OpenTelemetry appender yourself. The agent would pick up its usage automatically.
However, if the agent bytecode scanning and manipulation are taking too long, feel free to drop the agent altogether and use the manual instrumentation.
It is also worth nothing that Java agents are not supported by GraalVM native images.
Of course, the approach mentioned in this article also works for non-Spring applications.
Closing Remarks
Installing the OpenTelemetry Java agent and keeping it up to date can be hard when applying a traditional approach, mainly because developers are used to editing Dockerfiles by hand
Using a Gradle and Jib makes it easy to integrate the Java agent with your application. It gives you the added benefit of automatically getting update notifications when using dependency management software like Dependabot or Renovate.
How have you experienced OpenTelemetry? Let me know!
Subscribe to the RSS feed for more content like this.
The contents of this article are licensed under the CC BY-NC-SA 4.0 license.